@PropertySource 加载 properties配置文件
1、通过《Spring Boot @ConfigurationProperties 、@Value 注值》知道使用“@Value”与“@ConfigurationProperties”可以从全局配置文件“application.properties”或者“application.yml”中取值,然后为需要的属性赋值。
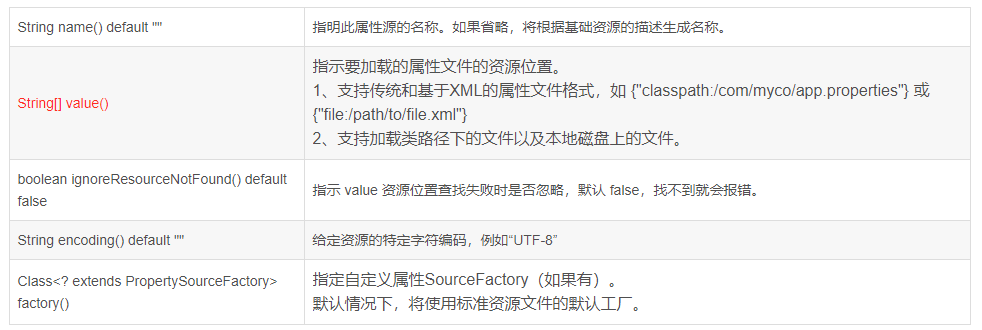
2、当应用比较大的时候,如果所有的内容都当在一个配置文件中,就会显得比较臃肿,同时也不太好理解和维护,此时可以将一个文件拆分为多个,使用 @PropertySource 注解加载指定的配置文件,注解常用属性如下:

3、下面演示使用 @PropertySource 注解 加载类路径下的 user.properties 配置文件,为 User.java POJO 对象的属性赋值。
1
2
3
4
5
6
7
8
9
10
11
12
13
14
15
16
17
18
19
20
21
22
23
24
25
26
27
28
29
30
31
32
33
34
35
36
37
38
39
40
41
|
@Component
@PropertySource(value = {"classpath:user.properties"})
@ConfigurationProperties(prefix = "user1")
public class UserProperty {
private Integer id;
private String lastName;
private Integer age;
private Date birthday;
private List<String> colorList;
private Map<String, String> cityMap;
private Dog dog;
}
|
@PropertySource 加载 yml 配置文件
1、仍然以为实体对象注入属性值为例进行演示:
1
2
3
4
5
6
7
8
9
10
11
12
13
14
15
16
17
18
19
20
21
22
23
24
25
26
27
28
29
30
31
32
33
34
35
36
37
38
39
40
41
42
43
44
45
46
47
48
|
@Component
@PropertySource(value = {"classpath:user.yml"}, factory = PropertySourceFactory.class)
@ConfigurationProperties(prefix = "user")
public class UserYml {
private Integer id;
private String lastName;
private Integer age;
private Date birthday;
private List<String> colorList;
private Map<String, String> cityMap;
private Dog dog;
}
|
2、然后提供用于处理 yml 配置文件的属性资源工程如下:
1
2
3
4
5
6
7
8
9
10
11
12
13
14
15
16
17
18
19
20
21
22
23
24
25
26
27
28
29
30
31
32
33
34
35
36
37
38
39
40
41
42
| import org.springframework.boot.env.YamlPropertySourceLoader;
import org.springframework.core.env.PropertySource;
import org.springframework.core.io.support.DefaultPropertySourceFactory;
import org.springframework.core.io.support.EncodedResource;
import java.io.IOException;
import java.util.List;
public class PropertySourceFactory extends DefaultPropertySourceFactory {
@Override
public PropertySource<?> createPropertySource(String name, EncodedResource resource) throws IOException {
if (resource == null) {
return super.createPropertySource(name, resource);
}
List<PropertySource<?>> sources = new YamlPropertySourceLoader().load(resource.getResource().getFilename(), resource.getResource());
return sources.get(0);
}
}
|
@PropertySource 从本地磁盘加载文件
1、PropertySource 不仅支持加载类路径下的文件,还支持加载本地磁盘上的文件。
1
2
3
4
5
6
7
8
9
10
11
12
13
14
15
16
17
18
19
20
21
22
23
24
25
26
27
28
29
30
31
32
33
34
35
36
37
38
39
40
41
42
43
44
45
46
47
48
49
50
51
52
53
54
55
56
|
@Component
@PropertySource(value = {"file:${user.dir}/userDisk.properties"})
@ConfigurationProperties(prefix = "user2")
public class UserDisk {
private Integer id;
private String lastName;
private Integer age;
private Date birthday;
private List<String> colorList;
private Map<String, String> cityMap;
private Dog dog;
|
- 磁盘文件(其它 yml、xml格式也是同理):
@ImportResource 导入Spring 配置文件
1、@ImportResource 注解用来导入 Spring 的配置文件,如核心配置文件 “beans.xml”,从而让配置文件里面的内容生效;
2、如果应用中仍然想采用以前 xml 文件的配置方式,如 “beans.xml” ,则使用 “@ImportResource” 注解轻松搞定。
3、将 @ImportResource 标注在一个配置类上,通常直接放置在应用启动类上,和 @SpringBootApplication 一起即可。
1
2
3
4
5
6
7
8
9
10
11
12
13
14
15
16
17
18
19
20
21
22
23
24
25
26
27
28
| import org.springframework.boot.SpringApplication;
import org.springframework.boot.autoconfigure.SpringBootApplication;
import org.springframework.context.annotation.ImportResource;
@ImportResource(value = {"classpath:beans.xml"})
@SpringBootApplication
public class CocoApplication {
public static void main(String[] args) {
SpringApplication.run(CocoApplication.class, args);
}
}
|
4、然后就可以在类路径下提供原始的 beans.xml 配置文件:
1
2
3
4
5
6
7
8
9
10
11
12
13
| <?xml version="1.0" encoding="UTF-8"?>
<beans xmlns="http://www.springframework.org/schema/beans"
xmlns:xsi="http://www.w3.org/2001/XMLSchema-instance"
xsi:schemaLocation="[http://www.springframework.org/schema/beans http://www.springframework.org/schema/beans/spring-beans.xsd">](http://www.springframework.org/schema/beans%C2%A0http://www.springframework.org/schema/beans/spring-beans.xsd%22>);
<!-- 放入到Sping容器中,这是以前Spring的内容,不再累述-->
<bean id="userService" class="com.lct.service.UserService"/>
</beans>
|
5、启动应用控制台会打印:loading XML bean definitions from class path resource [beans. xml] 表示加载成功。


